
When you set out to build your own 4×4/expedition vehicle, there are many possible modifications that you can make. The below blog gives a brief outline on the main modifications available, the pros and cons of doing them, and other relevant information that may not be so evident.
CONTENTS
- Rims and Tyres
- Lift
- General Extras
- Snorkel
- Bull Bar
- Roof Rack
- Winch
- Lighting
- Lockers and Traction Control
- Camping Extras
- Drawers
- Roof Tent
- Awning
- Auxiliary Battery
- Fridge/Freezer
- Solar Panel
1. Rims and Tyres
Types of Tyres
Tyres provide traction or “Grip”, the main three types of tyres are:
Road Tyres – are great on the tarmac and good on murram too. However when you get into some mud, they become slicks very quickly and offer little to no grip at all.
All Terrain tyres (A/T) – these perform very well on road as well as murram and also in mud. Their road noise is minimal, handling is better and tread life is usually longer than Mud Terrain tyres.
Mud Terrain tyres (M/T) – these tend to cause “road noise” on tarmac, however they do work well on tarmac. Where they benefit the most; is in thick mud, they have large lugs which clean themselves as the wheels spin; providing continual traction in mud. Mud tyres give you worse fuel economy, and will wear out faster than the equivalent A/T tyres due to the larger lugs.
Tyre Size
Tyre sizes are complex to understand. The main numbers you need to grasp are: the outer tyre diameter, the rim diameter (inner tyre diameter) and the tyre width. Ideally look online for a tyre size converter to convert your 285/75/R16 into something that makes more sense.
When building an expedition vehicle, there is always an incline to get bigger tyres, but why? Larger tyres are essentially the only way (there are other more advanced ways) to lift your axles further off the ground; giving you better ground clearance to drive over larger rocks without scraping your axles. Do note that a 2” bigger diameter tyre will only give you an extra 1” of ground clearance.
Rims
Steel or Alloy?
Steel rims are heavier and cheaper. Once the paint gets scraped off they will start to rust. They tend to bend on heavy impacts-however they can still be pushed back into shape by a good metal workshop (or even a good hammering-if you’re in the middle of nowhere).
Alloy Rims are much lighter and more expensive. They give you better fuel economy (slightly), they are quite strong and wont bend under small hits, but one large hit and the rim will give in and crack; and once they do-they are essentially useless.
Offset Rims
(Negative) Offset rims are great; they make your tyres stick out. However they do add a lot more strain onto your axle studs and force your steering components to do more work during turning. On the plus side they widen your wheelbase, which in turn increases your stability on the road. Sometimes you may need offset rims in order to fit larger or wider tyres under your car (because with the standard rims the larger tyres may scrape your wheel arch or touch various steering or suspension components).
2. Lift
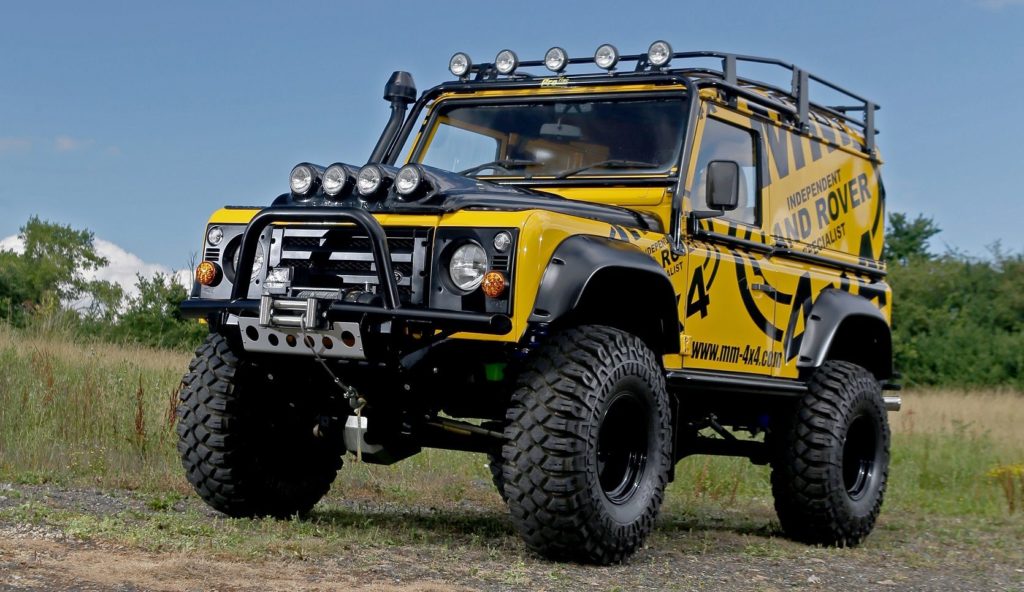
Lifted vehicles look cool, let’s face it. But apart from the looks, what is the benefit? Well, ground clearance (not of the axles themselves; which are the lowest part of your vehicle), but it lifts your chassis and body off the ground. So it can improve your approach, departure and ramp-over angles, but most importantly allow you to fit larger tyres. Lifting your vehicle further off the ground will move your centre of gravity higher and decrease stability on the road and handling.
There are two types of lift-
( i ) Suspension Lift
This involves putting longer springs or spacers under your springs. It will move the entire chassis and body up off the ground; improving your approach, departure and ramp-over angles. This type lifts everything above the axles further off the ground. However it is usually quite expensive – for a 1” to 2” suspension lift; you can get away with just changing your springs and shocks (you may even get away with just changing the springs, or adding spacers, and the old shocks may still fit): anything above 2” will likely require more modifications; caster wedges/bushes, steering upgrades, longer brake lines, longer shocks, longer stabilizer links and the list increases as you increase the amount of lift. With suspension lift you need to be careful to do it correctly or you will lose ride comfort and handling (not to mention the extra strain you will put on your existing components; which will fail much faster than normal).
( ii ) Body Lift
This involves adding spacers to your body mounts lifting the body of your vehicle further off the chassis (the chassis stays in the same place). This has its benefits-you don’t need to change your suspension (just your radiator mounts), your vehicle looks lifted, it raises the wheel arches (if you wanted to fit bigger tyres). The down side of this lift is that your chassis still stays in the same place-so if you are trying to improve your approach or departure angles-it probably won’t make a difference. This is definitely the cheapest option for lift, and will not require additional modifications, won’t really affect your vehicle drivability or handling, it simply raises the centre of gravity slightly). One point to note however is that if you have already mounted Bar work (bull bars, rear bars and side steps) they will be left behind when the body is lifted (so you may need to lift them up too).
3. General Extras
Snorkel
The core function of a snorkel is to raise the level of the air-intake to reduce the chance of water entering your engine. This allows you to drive into deeper water (as long as your snorkel is above the water level) without sucking water into your engine (and destroying it). There are some additional benefits of a snorkel:
- A higher air intake will reduce the amount of dust entering the system
- To allow cooler air to enter your engine
- To produce a ‘ram effect’. The air is rammed into your engine using your vehicles forward motion rather than the engine sucking air in.
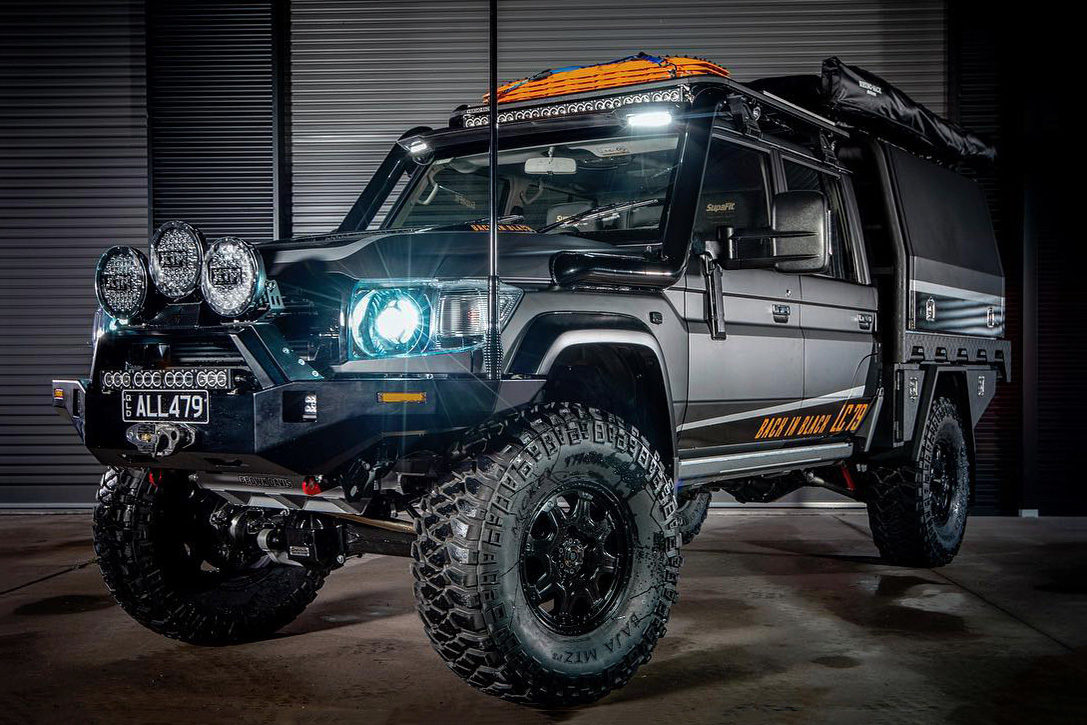
Bull Bar
Is a big metal bar in front of your vehicle. In most cases it will replace the factory bumper of your car. It is added protection during collisions and saves your lights, radiator and other components during a collision from the front. Apart from protection, they give you a great place to mount extra lights and antennae to your car.
Bull bars weigh up to 50kg and the added weight may affect your vehicles suspension (so do consider this before fitting one in, you may even need heavier front springs to compensate for the constant extra weight). There are aluminium/alloy bars available which will definitely be lighter, but they just don’t tend to be as strong as the steel ones.
Roof Rack
Lots of people have them, they look great and are fantastic for storage; especially bulky items that may not fit inside your car (for example; bicycles, surfboards or any large miscellaneous items). They are also great for items that you wouldn’t want to keep inside your car, like firewood or petrol.
However; you need to be careful, because storing stuff on your roof increases your centre of gravity (reducing your stability on the road) and overloading the roof can cause damage to your rainwater gutters and main vehicle pillars.
Not many people realise this, but most 4WD’s are actually only rated to carry 100kg on the roof of the car, with a few rated for upto 150kg, and very few rated for up to 200kg (like the 200 series Landcruiser). You should research what your model is rated to carry before buying a roof rack. This load capacity, includes the weight of the roof rack iteslf. So there isn’t much point buying a heavy duty 60kg roof rack, when your roof is only rated for 100kg (means you can only load 40kg on the rack).
Winch
If you are going out by yourself in some tough terrain and are likely to get stuck. I would say a winch is ESSENTIAL. It is the most effective form of self-recovery available. However they weigh at least 40kg so they do add a considerable amount of weight to the front of your car (when combined with a bull bar-the front springs should definitely be replaced with springs designed to accommodate the extra load). If you have a bull bar or are getting one, ensure it is winch compatible; otherwise you may end up having to do your own modifications to fit the winch on the bar.
There are three types; electric, hydraulic and mechanical. Electric are the most common.
4. Lighting
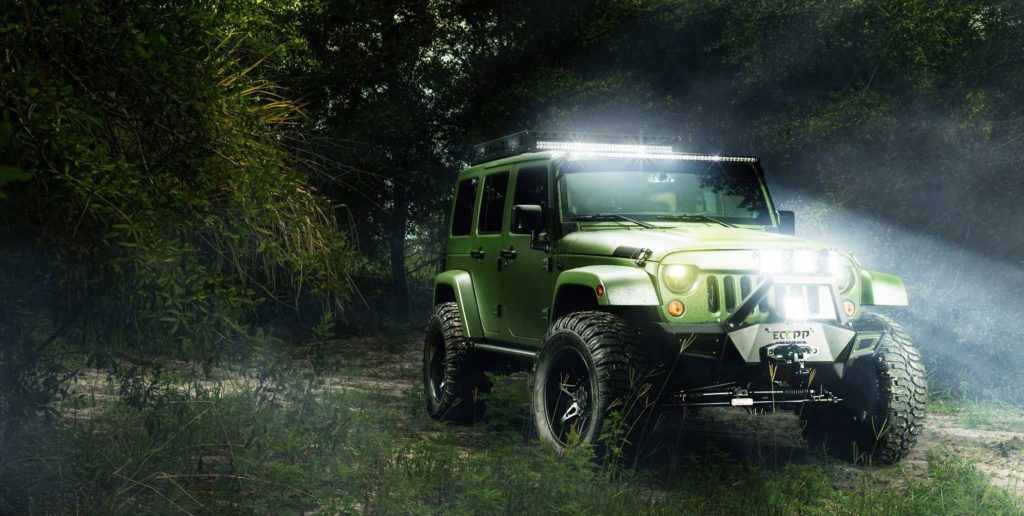
When out on long distance drives at night you really do need good visibility for your own safety. Especially on roads with no illumination. A good combination of aftermarket lights will illuminate a wide area of your surroundings and give you ample time to react to and see various obstacles.
Also while stationary; extra lights attached around the car are very handy at the camp or during nighttime breakdowns.
Spot Lights or Driving Lights (<30 degree beam spread)
Provide a long ray of light; illuminating the area directly in front of you. They work well for long distance driving and the better ones can illuminate up to 1km ahead of you.
Flood Lights (>30degree beam spread)
Or Spread beam lights provide a wide beam that illuminates a much wider area but for a shorter distance. They work well for low speed driving, off-road driving and camp lighting.
LEDs vs Halogens
LED’s use far less power, but generally have poor range. They are ideal for flood beams.
Halogen lights have much better range, but use far more power and are therefore better for driving lights. However the newer models of LED’s are getting better range than before. Another point to note is: typically most LED lights are terrible during rain and fog, halogen lights perform much better in these conditions.
Ideally a combination of flood beams and spot beams are the best solution for driving lights. As for camp lights; flood beams work best. Do note where you mount your lights as they can easily get damaged while driving through bushes or with stones being flicked up from the car in front of you.
5. Lockers and Traction Control
To understand this topic you first need to understand how a car differential works. Check out this video:
https://www.youtube.com/watch?v=SOgoejxzF8c
Now that you understand how a differential works in a car; you understand that the vehicle will always send drive to the wheel with the least resistance (which is usually the wheel that has no traction or is “slipping”).
Full time 4WD vehicles essentially have a “centre diff”-which splits the drive between the front and rear axles. When you engage the 4WD or the “Centre Diff Lock” to put the vehicle in 4WD; this splits the drive equally between the front and rear axle. Part time 4WD vehicles usually work in two wheel drive; and will send 50% of the drive to the other axle once you engage 4WD mode.
However even when you have engaged 4WD in your car; it only splits the drive equally to the front and rear axles; the individual front and rear differentials then split that drive between the two wheels on the axle. So to be stuck; all you need is one wheel on each axle without any traction and all the drive will be sent to those wheels (by a normal unlocked differential), and they will simply spin and do nothing.
This is where individual axle diff locks come in, not to be confused with a centre diff lock. They lock the drive shafts on an individual axle to act as one, thus ensuring that drive is sent equally to both wheels on that axle. You can get these lockers on either your front or rear axle or both.
This diff locks work in various ways:
Air lockers – these are the most common aftermarket lockers and they use air pressure to lock. They require an air compressor to work.
Vacuum lockers – they usually use the cars vacuum system to operate. And these are mostly the factory fitted type.
Electronic locker – these use motors on each diff to engage and disengage (they are highly sensitive to water damage). Usually factory fitted.
Cable lockers – these factory fitted lockers use steel cables to engage the locks and were mostly found in cars pre 1990. They are the most robust and reliable since they are fully mechanical.
Automatic lockers/E-lockers – these lockers work using a mechanical system and are fully locked all the time until they “sense” that they need to unlock. They are very effective; however they make a loud metallic “clang” when they engage and disengage (not the best sound to hear from your car).
6. Camping Upgrades
Drawers

They technically do take up a lot of your boot space, and add constant weight to your vehicle. But a good set of drawers will maximize the space that they occupy. Not only do they provide you storage space, but they give you organised storage; so that you can easily get to that one item in your boot without having to empty everything on top. A good set of drawers will make maximum use of the space taken up, without having dead zones. The materials used must be water resistant; otherwise after a few spills in your boot-your drawers will start collapsing (if they are made of wood). Furthermore a set of drawers with wings will give you a nice flat base upon which you can easily pack the rest of your items. Check out our Drawer systems.
Roof Tent
Roof tents do take up a lot of space on your roof. However sleeping off the ground offers some clear benefits;
- Comfort – you don’t need to worry about the terrain or flooding.
- Security – safely away from animals and crawling bugs.
- Easy to set up – most of them are quite quick to set up.
- Inbuilt Mattress – this is definitely a big plus point of roof tents.
Although there are also some clear compromises:
They weigh 40-60kg, they are quite small (most will fit a maximum of 2 people), they add quite a bit of height to your vehicle and they are far more expensive than equivalent sized ground tents.
Awning

An awning is a shade; in this case a shade that is permanently attached to the side or back of the car for convenience. So that it can be set up quickly and it doesn’t take up valuable storage inside the car. Also making it impossible to forget at home. Granted; awnings do add constant weight to the car and you can probably buy a cheap pop-up gazebo for far less, we still do believe the pros outweigh the cons. There are several types of vehicle awnings available and it is up to you to decide what will suit your needs. Prices range from $250 to $2000, most of them are made out of high quality ripstop nylon (which is far superior to most of the cheap gazebos available). When it comes to awnings, we personally hate upright poles, guy ropes, pegs, and a long-winded setup; that’s why we came up with “The Canopy” awning.
Auxiliary Battery
Usually, when out on an expedition, you will require power. The best way is to carry around an auxiliary battery so that you don’t drain your vehicles main starter battery. The auxiliary battery can run peripherals, such as camp lighting, your fridge/freezer, your inverter, charge up your phones and maybe even run a water pump. All these tasks require batteries that can take constant loading. Our vehicles starter batteries are not designed for this. They are designed to give a large current to your starter motor in order to start your vehicle.
For your auxiliary battery you will need a deep cycle battery, either Sealed Lead Acid, GEL, AGM or even a Lithium battery if your budget allows. All these types of batteries will do the job and there’s a lot of information about all this battery tech.
You can actually take your auxiliary battery to the next level by connecting a split charging system that will safely charge your battery using the alternator and even charge the battery from another 12V source such as a solar panel. Also ensure you have a voltage isolator, which will disconnect your starter batteries from your auxiliary battery when you stop to set up camp. This will ensure you don’t drain your starter batteries and your vehicle is always ready to go.
Fridge/Freezer
When you are out exploring, you will need to keep things cold. For shorter trips, a cooler box may do the trick, with a few handy ice packs. However, you waste lots of valuable space with ice packs and your food and drinks will only be cooled while the ice packs last. Thankfully, there’s a better solution. 12/24V Fridge Freezers are a solution to keep things cold whilst camping. Most modern compressor driven car fridges can even freeze items down to -22 degrees Celsius whilst barely drawing a few amps from your battery. They are usually quite expensive, but we think it’s worth the investment. If you are planning to build a proper expedition vehicle. These fridge freezers range from 10L to above 90L capacities. The size you get will be dependent on the space in your vehicle, how many people you are catering for and what your budget allows. Invest in a proper compressor driven fridge and it will change your camping experience. No more fiddling around with ice packs, buying dry ice and pre planning cold storage. Fridges on the trip are an essential for us.
Solar Panel
Solar panels can be very useful. If you are out camping for an extended period and are running a few electrical accessories like your fridge, inverter to charge your electronics and some lighting, then a solar panel can help keep all your batteries topped up. Paired with a proper charge controller, solar panels can be used to charge your auxiliary battery and some even top up your starter batteries so that you are never going to be stranded. Panels range in size and can be either folded panels which you can deploy at camp, or can be permanently mounted to your roof, bonnet or trailer. We would recommend going for a panel that can supply at least 60W or more to comfortably keep all your batteries well topped up. Solar panels do require charge controllers to properly charge a 12V system, so make sure you spend the time to research what’s available. Not fitting a good charge controller can kill your batteries.
3 thoughts on “Beginners Guide to Building an Expedition Vehicle”
I just started reading ultraredoutdoors.com. Once I stumbled upon you and Toolsradar, I stopped looking anywhere else. Thank you for the information.
2020 suvs have cool features compare to last year’s
Howdy! I could have sworn I’ve been to this website before but after checking through some of the post I realized it’s new to me. Anyhow, I’m definitely happy I found it and I’ll be book-marking and checking back often!
Comments are closed.